在前一篇文章 zkSync 帳戶抽象 (Account Abstraction) 程式範例說明了如何撰寫和部署帳戶抽象合約,也有使用抽象帳戶發起交易的方法。不過專案是用 zksync-cli 建立,使用的是 Ethers.js v5 的版本。這篇文章會以如何在 Dapp 中,使用現成抽象帳戶的角度來說明。包含 Ethers.js v5 和 v6 的用法,以及實際使用 Metamask 連接使用效果。
zksync 套件
zkSync 提供了官方的套件可以用來處理帳戶抽象相關的交易,原先的版本為 zksync-web3,新的版本更名為 zksync2-js。分別對應到 Ethers.js v5 和 v6。
- Ethers.js v5:使用 zksync-web3。
- Ethers.js v6:使用 zksync2-js。
連接錢包
首先要連接錢包,即為後續程式中的 signer 和 provider 的取得方式。
v6
私鑰錢包
1
2
3
4
5
| import { Provider, Wallet } from 'zksync2-js';
const privateKey = '0x...'
const provider = new Provider(url);
const signer = new Wallet(privateKey, provider);
|
瀏覽器錢包
1
2
3
4
| import { BrowserProvider } from 'zksync2-js';
const provider = new BrowserProvider(window.ethereum);
const signer = await provider.getSigner();
|
雖然目前使用 ethers 中的 Provider 也能運作,不過在使用 Paymaster 的功能的時候會有問題,所以這裡使用 zksync2-js 提供的 Provider。
v5
私鑰錢包
1
2
3
4
5
| import { Provider, Wallet } from 'zksync-web3';
const privateKey = '0x...'
const provider = new Provider(url);
const signer = new Wallet(privateKey, provider);
|
瀏覽器錢包
1
2
3
4
| import { Web3Provider } from "zksync-web3";
const provider = new Web3Provider(window.ethereum);
const signer = await provider.getSigner();
|
必須使用 zksync-web3 提供的 Provider,否則會有以下錯誤:
1
| Error: unsupported transaction type: 113
|
產生 Tx 物件
呼叫合約
前一篇文有提到呼叫合約方法,主要就是改使用 populateTransaction 來建立 tx 物件,原本使用以下方式直接送出:
1
| await contract.method();
|
要改成產生 Tx 物件,再進行下一步操作,v6
1
2
|
let tx = await contract.method.populateTransaction({ from: signer.address });
|
v5
1
| let tx = await contract.populateTransaction.method();
|
然後加上一些資訊
1
2
3
4
5
6
7
8
9
10
11
12
13
14
15
16
17
18
19
20
21
22
23
24
25
26
|
import { utils, types } from 'zksync2-js';
const accountAddress = '0x...';
const gasPrice = (await provider.getFeeData()).gasPrice;
tx = {
...tx,
from: accountAddress,
gasLimit: await provider.estimateGas(tx),
gasPrice,
chainId: (await provider.getNetwork()).chainId,
nonce: await provider.getTransactionCount(accountAddress),
type: 113,
customData: {
gasPerPubdata: utils.DEFAULT_GAS_PER_PUBDATA_LIMIT,
} as types.Eip712Meta,
value: 0
};
|
傳送 Ether
抽象帳戶要傳送 Ether 可以用下面方式產生 tx 物件
1
2
3
4
5
6
7
8
9
10
11
12
13
14
| let tx = {
data: '0x',
to: '0x...',
from: accountAddress,
gasLimit: 200000,
gasPrice: (await provider.getFeeData()).gasPrice,
chainId: (await provider.getNetwork()).chainId,
nonce: await provider.getTransactionCount(accountAddress),
type: 113,
customData: {
gasPerPubdata: utils.DEFAULT_GAS_PER_PUBDATA_LIMIT,
} as types.Eip712Meta,
value: ethers.utils.parseEther('0.001')
};
|
簽章
接著對 tx 物件進行簽章
1
2
3
4
5
6
7
| import { EIP712Signer } from 'zksync2-js';
const eip712Signer = new EIP712Signer(signer, tx.chainId!);
tx.customData = {
...tx.customData,
customSignature: await eip712Signer.sign(tx)
};
|
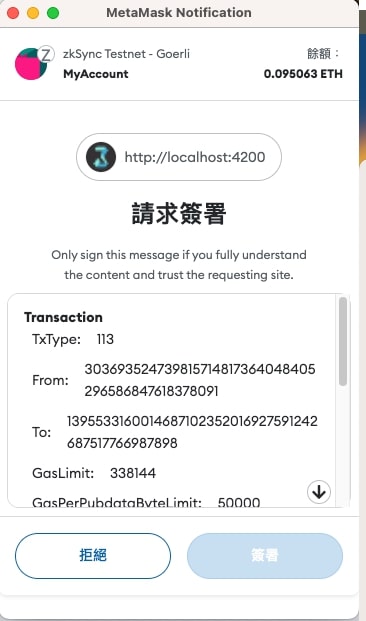
在 Metamask 簽署的時候會看到類似下面的畫面

送出交易
最後要將準備好的 tx 送出到鏈上,v5 和 v6 版本有些不同。
v5
1
2
3
| import { utils } from 'zksync-web3';
const txResp = provider.sendTransaction(utils.serialize(tx));
|
v6
1
2
3
4
| import { utils } from 'zksync2-js';
const txHash = await provider.send('eth_sendRawTransaction', [utils.serializeEip712(tx)]);
|
延伸閱讀
zkSync 帳戶抽象 (Account Abstraction) 程式範例
使用 Ethers.js 操作 zkSync Paymaster
使用 Web3.js 操作 zkSync 帳戶抽象


