在之前的文章 Solidity - zkSync Paymaster 程式範例說明了如何撰寫和部署 Paymaster 合約,也有使用 Paymaster 發起交易的方法。不過專案是用 zksync-cli 建立,使用的是 Ethers.js v5 的版本。這篇文章會說明如何在 Web3.js 的專案中使用,本篇文章使用 Web3.js 4.2.2 版本。
zksync 套件
zkSync 提供了官方的套件 zksync2-js 可以用來處理 Paymaster 相關的交易。但是該套件使用 Ethers.js 做為底層來開發,使用這套件等於要同時使用 Ethers.js。我這裡依據官方原始碼改寫了一份 Web3.js 版本的,可直接加入專案使用,就不用和 Ethers.js 混合使用。例如儲存為 paymaster-utils.ts:
1
2
3
4
5
6
7
8
9
10
11
12
13
14
15
16
17
18
19
20
21
22
23
24
25
26
27
28
29
30
31
32
33
34
35
36
37
38
39
40
41
42
43
44
45
46
47
48
49
50
51
52
53
54
55
56
57
58
59
60
61
62
63
64
65
66
67
68
69
70
71
72
73
74
75
76
77
78
79
80
81
82
83
84
85
86
87
88
89
90
91
92
93
94
95
96
| import { Bytes, Contract, Numbers } from 'web3';
const FLOW_ABI = [
{
inputs: [
{
internalType: 'address',
name: '_token',
type: 'address',
},
{
internalType: 'uint256',
name: '_minAllowance',
type: 'uint256',
},
{
internalType: 'bytes',
name: '_innerInput',
type: 'bytes',
},
],
name: 'approvalBased',
outputs: [],
stateMutability: 'nonpayable',
type: 'function',
},
{
inputs: [
{
internalType: 'bytes',
name: 'input',
type: 'bytes',
},
],
name: 'general',
outputs: [],
stateMutability: 'nonpayable',
type: 'function',
},
];
const flow = new Contract(FLOW_ABI);
export interface ApprovalBasedPaymasterInput {
type: 'ApprovalBased';
token: string;
minimalAllowance: Numbers;
innerInput: Bytes;
}
export interface GeneralPaymasterInput {
type: 'General';
innerInput: Bytes;
}
export type PaymasterInput =
| ApprovalBasedPaymasterInput
| GeneralPaymasterInput;
export type PaymasterParams = {
paymaster: string;
paymasterInput: Bytes;
};
export function getApprovalBasedPaymasterInput(
paymasterInput: ApprovalBasedPaymasterInput
): Bytes {
return (flow as any).methods
.approvalBased(
paymasterInput.token,
paymasterInput.minimalAllowance,
paymasterInput.innerInput
)
.encodeABI();
}
export function getGeneralPaymasterInput(
paymasterInput: GeneralPaymasterInput
): Bytes {
return (flow as any).methods.general(paymasterInput.innerInput).encodeABI();
}
export function getPaymasterParams(
paymasterAddress: string,
paymasterInput: PaymasterInput
): PaymasterParams {
if (paymasterInput.type == 'General') {
return {
paymaster: paymasterAddress,
paymasterInput: getGeneralPaymasterInput(paymasterInput),
};
} else {
return {
paymaster: paymasterAddress,
paymasterInput: getApprovalBasedPaymasterInput(paymasterInput),
};
}
}
|
必須搭配帳戶抽象使用,請參考使用 Web3.js 操作 zkSync 帳戶抽象。
產生 Paymaster 參數
使用 Paymaster 發送交易要在交易中帶入 Paymaster 相關參數,可以使用上面實作的方法:
1
| getPaymasterParams(paymasterAddress: string, paymasterInput: PaymasterInput): PaymasterParams
|
- paymasterAddress: Paymaster 合約地址。
- paymasterInput: Paymaster 使用的類型和參數,目前有兩種類型,參考下面範例。
- 回傳值:Tx 中
customData 的 paymasterParams 資料格式,參考下面範例。
PaymasterInput 範例如下:
General
1
2
3
4
5
6
7
8
9
10
11
12
13
14
| import { getPaymasterParams } from './paymaster-utils';
const PAYMASTER = '0xf9340983982a75985518CEa03129381be8b20F74';
const paymasterParams = getPaymasterParams(PAYMASTER, {
type: 'General',
innerInput: '0x'
});
|
ApprovalBased
1
2
3
4
5
6
7
8
9
10
11
12
13
14
15
16
17
18
19
20
21
| const PAYMASTER = '0xf9340983982a75985518CEa03129381be8b20F74';
const TOKEN = '0xa1987D356Af995581D296dFeA2de8e9Ff2E418dF';
const paymasterParams = getPaymasterParams(PAYMASTER, {
type: 'ApprovalBased',
token: TOKEN,
minimalAllowance: '30000000000000000000',
innerInput: '0x'
});
|
預估手續費
1
2
3
4
5
6
7
8
9
10
11
12
13
14
15
16
17
18
| const account = '0x';
let tx: any = {
data: (contract as any).methods.method().encodeABI(),
to: contract.options.address,
from: account,
chainId: (await web3.eth.getChainId()).toString(),
nonce: (await web3.eth.getTransactionCount(accounts[0])).toString(),
type: 113,
customData: {
gasPerPubdata: DEFAULT_GAS_PER_PUBDATA_LIMIT,
paymasterParams
},
value: 0
};
const gasLimit = await web3.eth.estimateGas(tx);
const gasPrice = await web3.eth.getGasPrice();
|
如果是使用 ApprovalBased 要重新計算一次 paymasterParams 的 minimalAllowance
1
2
3
4
5
6
7
8
9
10
11
| const tokenPrice = 2000n;
paymasterParams = getPaymasterParams(PAYMASTER, {
type: 'ApprovalBased',
token: TOKEN,
minimalAllowance: (gasLimit * gasPrice! * tokenPrice).toString()
innerInput: '0x'
});
|
簽章
接著進行和帳戶抽象一樣的後續動作,發送者 from 可以是 EOA 地址或是抽象帳戶地址。web3OrPrivateKey 取得方式參考之前文章。
1
2
3
4
5
6
7
8
9
10
|
tx.gasPrice = gasPrice.toString();
tx.gasLimit = gasLimit.toString();
tx.customData.paymasterParams = paymasterParams;
const signer = new EIP712Signer(web3OrPrivateKey, tx.chainId!);
tx.customData = {
...tx.customData,
customSignature: await signer.sign(tx),
} as any;
|
送出交易
最後要將準備好的 tx 送出到鏈上。
1
2
3
4
5
6
| const txHash = await web3.currentProvider!.request(
{
method: 'eth_sendRawTransaction',
params: [serialize(tx)]
}
);
|
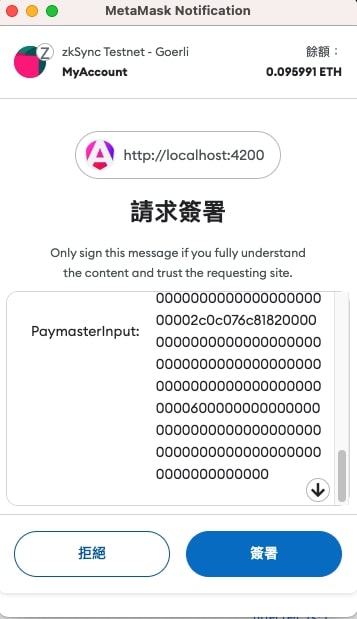
實際發送出交易 Metamask 會看到下面畫面:

會發現它其實是使用和帳戶抽象一樣的簽章方式來發送,只是多了 paymasterParams 資料。
延伸閱讀
Solidity - zkSync Paymaster 程式範例
使用 Web3.js 操作 zkSync 帳戶抽象
使用 Ethers.js 操作 zkSync 帳戶抽象


